搜索到
95
篇与
的结果
-
 VPS流量用不完,利用webBenchmark做点有意义的事情——给垃圾VPS做压力测试 一前言1关于webBenchmarkGithub地址http 基准测试工具耗尽了您的服务器带宽。 用户在使用本工具前请先查看授权及免责声明,webBenchmark一个用于测试网页服务器性能的工具,启用其他用途,后果自负。 每次请求时随机使用 User-Agent 可自定义的 Referer Url, 可自定义的标题, 并发例程随您所愿,取决于您的服务器性能。 http post 模式 指定多目标ip,或者通过系统dns解析。 随机 X-Forwarded-For 和 X-Real-IP(默认开启)。2用途自动调整并发例程以获得最佳性能。 支持指定目标 IP 地址的非标准端口。 来自远程服务器的订阅基准测试任务。二 安装教程1 下载脚本wget https://github.com/maintell/webBenchmark/releases/download/0.5/webBenchmark_linux_x642 修改权限chmod +x webBenchmark_linux_x643 开启测试./webBenchmark_linux_x64 -c 32 -s https://target.url4 示例# send request to 10.0.0.1 and 10.0.0.2 for https://target.url with 32 concurrent threads # and refer is https://refer.url ./webBenchmark_linux_x64 -c 32 -s https://target.url -r https://refer.url -i 10.0.0.1 -i 10.0.0.2 # send request to https://target.url with header regid:123 and sign:Random10 ./webBenchmark_linux_x64 -s https://target.url -H 'regid:123' -H 'sign:QpXDYHdVzB'5 其他使用方法webBenchmark -c [COUNT] -s [URL] -r [REFERER] -c int concurrent routines for download (default 16) -r string referer url -s string target url (default "https://baidu.com") -i string custom ip address for that domain, multiple addresses automatically will be assigned randomly -H http header pattern http header pattern, use Random with number prefix will generate random string, same key will be overwritten -f string randomized X-Forwarded-For and X-Real-IP address -p string post content三 用途有收到诈骗短信的,可以抓一下他们的软件安装包,通过webBenchmark刷流量。(实测选用0.5或者0.6这种老版本的更好用)
 -
端口敲门教程,防止端口被扫被爆破的简单方法 简介端口敲门通过关闭SSH端口,服务器监听预设的端口序列,当客户端按正确顺序敲门后,防火墙规则动态开放SSH端口,仅允许敲门成功的IP访问,阻止未授权访问。提示: 为了防止把自己关在门外,建议先测试再上生产环境,以下配置我是亲自测试过的能正常运行。正式开始1:安装iptables大部分常见的Linux发行版已经默认安装了,无需额外安装,并且你安装了Docker后也是肯定安装了iptables。可以运行iptables --version查看版本。如果没有安装,可以执行这个命令安装:sudo apt update && sudo apt install iptables -y2:安装端口敲门程序knockdsudo apt update && sudo apt install knockd -y3:配置knockdknockd的默认配置文件路径在/etc/knockd.conf[options] UseSyslog logfile = /var/log/knockd.log # 开启SSH访问 - 只允许敲门的IP访问 [openSSH] sequence = 5003,5001 seq_timeout = 15 start_command = /sbin/iptables -C INPUT -s %IP% -p tcp --dport 22 -j ACCEPT || /sbin/iptables -I INPUT 1 -s %IP% -p tcp --dport 22 -j ACCEPT tcpflags = syn cmd_timeout = 10 # 关闭所有SSH访问 - 阻止所有IP [closeSSH] sequence = 7001 seq_timeout = 15 start_command = /sbin/iptables -C INPUT -p tcp --dport 22 -j DROP || /sbin/iptables -I INPUT 1 -p tcp --dport 22 -j DROP && /sbin/iptables -D INPUT -s %IP% -p tcp --dport 22 -j ACCEPT 2>/dev/null tcpflags = syn cmd_timeout = 10可以将配置中的syn改成all,代表需要成功建立tcp三次握手才能触发敲门。也可以多增加几个敲门端口,也可以改成仅udp敲门,这样的话会加大触发敲门动作的难度4:启动knockdsudo systemctl enable knockd sudo systemctl start knockd5:关门网页访问7001端口关闭SSH服务,阻止所有IP访问SSH可以断开SSH连接,然后重新连接测试一下6:敲门按顺序网页访问5003和5001端口,即使网页返回无响应也能成功触发敲门,需要15秒内完成动作,敲门后会自动放行敲门的IP允许连接SSH。Liunx可以使用wget等命令敲门wget小提示:wget可以快速测试某个端口通不通,不通的话会直接返回拒绝连接(可选)关闭端口敲门停止并禁用knockdsudo systemctl stop knockd sudo systemctl disable knockd清除防火墙所有的自定义规则sudo iptables -F以上配置可以根据自己需求修改端口敲门不仅限于SSH端口,还能实现更多玩法。
-
LiNUX VPS上Server-Rust的手动安装教程 一 前言之前介绍了ServerStat在Linux VPS的安装配置、采用Vnstat来防止重启导致数据丢失的问题,以及如何在安装了openwrt的n1旁路由上安装Serverstat,需要的可以访问之前的博文:1)随时随地监控你的VPS状态——Serverstat部署折腾之路2)Serverstaus改用Vnstat统计VPS流量,避免服务器重启引起统计丢失3)N1折腾之openwrt安装ServerStatus_Rust客户端本文介绍下如何在LiNUX VPS上手动安装Server-Rust,包括client客户端和server服务器端的安装,client即发送流量信息的VPS,server即收集流量信息并汇总展示的VPS,一般1台服务器作为服务器端和客户端,其他VPS作为客户端。二 stat_client客户端安装教程1 /opt目录下创建ServerStat目录mkdir -p /opt/ServerStatus && cd /opt/ServerStatus2 下载stat_client客户端到官方地址下载根据自己的服务器内核选择合适的客户端版本,这里以x86 64位的Linux为例:wget --no-check-certificate -qO client-x86_64-unknown-linux-musl.zip https://github.com/zdz/ServerStatus-Rust/releases/download/v1.8.1/client-x86_64-unknown-linux-musl.zip3 解压缩unzip -o client-x86_64-unknown-linux-musl.zip4 修改stat_client的权限chmod +x stat_client5 复制stat_client.service到/etc/systemd/system/mv -v stat_client.service /etc/systemd/system/stat_client.service6 修改 /etc/systemd/system/stat_client.service 文件将IP改为你服务器的IP或你的域名,注意这里的-u后的用户名、-p后面的密码,与上面config.toml中的name、password必须一致,否则会通讯不成功。ExecStart=/opt/ServerStatus/stat_client -a "http://ss.vvars.com:8080/report" -u Server-alice -p vvars.com7 使用命令开机自启systemctl enable stat_client8 重新保存加载systemctl daemon-reload9 启动服务systemctl start stat_client10 查看状态,显示running即为成功systemctl status stat_client11 其他命令systemctl stop stat_client 停止客户端服务 systemctl restart stat_client 重启客户端服务三 stat_server服务器端安装教程部署stat_server的部分步骤与stat_client是一样的,具体如下1 /opt目录下创建ServerStat目录mkdir -p /opt/ServerStatus && cd /opt/ServerStatus2 下载stat_server服务器端到官方地址下载根据自己的服务器内核选择合适的客户端版本,这里以x86 64位的Linux为例:wget --no-check-certificate -qO server-x86_64-unknown-linux-musl.zip https://github.com/zdz/ServerStatus-Rust/releases/download/v1.8.1/server-x86_64-unknown-linux-musl.zip3 解压缩unzip -o server-1.8.1-unknown-linux-musl.zip4 修改stat_server的权限chmod +x stat_server5 复制stat_server.service到/etc/systemd/system/mv -v stat_server.service /etc/systemd/system/stat_server.service5修改/opt/ServerStatus/config.toml文件下面几个位置注意:1)管理用户名,用于查看 /detail, /map,建议设置,保护你的服务器安全。# 管理员账号,不设置默认随机生成,用于查看 /detail, /map jwt_secret = "" # 修改这个, 使用 openssl rand -base64 16 生成 secret admin_user = "vvars" admin_pass = "vvars.com"2) 修改host参数下的name和password参数这里的值将来作为服务器端和客户端通信的密码,需要配置准确。hosts = [ {name = "Server-alice", password = "vvars.com", alias = "alice 1刀落地机", location = "hk", type = "kvm", labels = "os=debian;ndd=2025/1/28;spec=1C/1G/5G;"}, {name = "h2", password = "p2", alias = "n2", location = "de", type = "kvm", disabled = false}, {name = "h3", password = "p3", alias = "n3", location = "hk", type = "kvm", monthstart = 1}, {name = "h4", password = "p4", alias = "n4", location = "cn", type = "kvm", notify = true, labels = "ndd=2022/11/25;spec=2C/4G/60G;"}, ]3 修改提醒机器人,以TG为例tg-bot-token网上教程很多,建议自行搜索。获取频道ID的办法可以参考 获取Telegram私人电报频道的ID的两种办法[tgbot] # 开关 true 打开 enabled = true bot_token = "tg-bot-token" #这里的Token通过TG的botFather创建和获取 chat_id = "-100xxxxxxx" #新建群聊,获取群聊id # host 可用字段见 payload.rs 文件 HostStat 结构, {{host.xxx}} 为占位变量 # 例如 host.name 可替换为 host.alias,大家根据自己的喜好来编写通知消息 # {{ip_info.query}} 主机 ip, {{sys_info.host_name}} 主机 hostname,见 server_status.proto title = "警告<b>Server Status</b>" online_tpl = "{{config.title}} \n哈哈 {{host.location}} {{host.name}} 主机恢复上线啦" offline_tpl = "{{config.title}} \n不好 {{host.location}} {{host.name}} 主机已经掉线啦" # custom 模板置空则停用自定义告警,只保留上下线通知 custom_tpl = """ {% if host.memory_used / host.memory_total > 0.5 %} <pre>不好 {{host.name}} 主机内存使用率超50%, 当前{{ (100 * host.memory_used / host.memory_total) | round }}% </pre> {% endif %} {% if host.hdd_used / host.hdd_total > 0.5 %} <pre>不好 {{host.name}} 主机硬盘使用率超50%, 当前{{ (100 * host.hdd_used / host.hdd_total) | round }}% </pre> {% endif %} """ ###################### tgbot end ############################6 测试配置文件是否正常systemctl daemon-reload #加载修改文件 ./stat_server -c config.toml -t #测试配置文件是否正常,没有问题的话会显示success字样 ./stat_server -c config.toml --notify-test #测试通知是否正常,正确的话会在相应的TG或者微信收到通知 ./stat_server -c config.toml #运行配置文件7 使用命令开机自启systemctl enable stat_server8 重新保存加载systemctl daemon-reload9 启动服务systemctl start stat_server10 查看状态,显示running即为成功systemctl status stat_server11 其他命令systemctl stop stat_server 停止服务器端服务 systemctl restart stat_server 重启服务器端服务参考文件ServerStatus-Rust安装脚本
-
解决电信运营商封禁80和443端口,修改openwrt路由器的web访问端口号 前言由于众所周知的原因,国内电信运营商宽带会封禁家用宽带的80/443端口号,但是有时候又需要远程访问路由器,除了桥接光猫外,今天介绍直接修改openwrt路由器的web访问端口号的方法。在OpenWrt路由器上,如何修改Web访问端口号,通常涉及到修改HTTP服务器的配置文件。默认情况下,OpenWrt使用的HTTP服务器是uHTTPd。以下是修改Web访问端口号的步骤:一、通过SSH登录路由器:使用SSH客户端连接到路由器。如果你的路由器上没有安装SSH服务器,你可能需要通过Web界面或其他方式启用SSH。二、编辑uHTTPd配置文件:执行命令vi /etc/config/uhttpd以编辑uHTTPd的配置文件。找到下面的代码:config uhttpd 'main' list listen_http '0.0.0.0:80' list listen_http '[::]:80'按键盘I进入编辑模式,将其修改为config uhttpd 'main' list listen_http '0.0.0.0:8080' list listen_http '[::]:8080'按下esc,然后输入:wq,并按Enter保存并退出:三、重新启动uHTTPd服务:为了使更改生效,需要重新启动uHTTPd服务。执行以下命令:/etc/init.d/uhttpd restart或者使用service命令:service uhttpd restart如果你使用了防火墙,你可能还需要更新防火墙规则以允许新的端口上的流量。
-
X-UI的手动安装教程,解救自动安装失败的VPS X-UI是一款非常优秀的科学工具,关于X-UI的特点、自动安装和使用教程,可以查看本站之前的文章:3x-ui安装指南+搭建reality+申请ssl证书。很多网友反馈采用自动脚本安装会失败,包括检测VPS内核、系统识别等等各种原因,其实github自动脚本install.sh中已经有了安装过程,今天就基于该脚本的解读,介绍下如何手动安装X-UI脚本:1 用SSH软件登录你的VPS2 打开/usr/local目录cd /usr/local/3 下载对应系统的压缩包wget -N https://github.com/MHSanaei/3x-ui/releases/download/v2.5.3/x-ui-linux-amd64.tar.gz4 解压,正常解压会产生一个x-ui的文件夹tar zxvf x-ui-linux-amd64.tar.gz5 打开上一步解压产生的x-ui文件夹,查看目录下的文件是否解压正常cd x-ui ls -a6 变更x-ui程序的权限chmod +x x-ui7 安装x-uibash ./x-ui.sh输入上述命令后,正常会弹出3x-ui的安装界面,选择1就是安装,如果安装过可以输入10查看目前安装的信息,记住安装的信息,然后通过浏览器登录,地址为 http://ip地址:端口号/面板路径,用户名和密码见快捷键10提供的当前配置信息:╔────────────────────────────────────────────────╗ │ 3X-UI Panel Management Script │ │ 0. Exit Script │ │────────────────────────────────────────────────│ │ 1. Install │ │ 2. Update │ │ 3. Update Menu │ │ 4. Legacy Version │ │ 5. Uninstall │ │────────────────────────────────────────────────│ │ 6. Reset Username & Password & Secret Token │ │ 7. Reset Web Base Path │ │ 8. Reset Settings │ │ 9. Change Port │ │ 10. View Current Settings │ │────────────────────────────────────────────────│ │ 11. Start │ │ 12. Stop │ │ 13. Restart │ │ 14. Check Status │ │ 15. Logs Management │ │────────────────────────────────────────────────│ │ 16. Enable Autostart │ │ 17. Disable Autostart │ │────────────────────────────────────────────────│ │ 18. SSL Certificate Management │ │ 19. Cloudflare SSL Certificate │ │ 20. IP Limit Management │ │ 21. Firewall Management │ │ 22. SSH Port Forwarding Management │ │────────────────────────────────────────────────│ │ 23. Enable BBR │ │ 24. Update Geo Files │ │ 25. Speedtest by Ookla │ ╚────────────────────────────────────────────────╝ Panel state: Stop Start automatically: Yes xray state: Stop Please enter your selection [0-25]: 18 激活x-ui的Servicecp -f x-ui.service /etc/systemd/system/ systemctl daemon-reload systemctl enable x-ui逐行输入9 启动x-ui Servicesystemctl start x-ui正常这个时候就可以正常使用了10 其他快捷命令systemctl stop x-ui systemctl restart x-ui systemctl status x-ui参考源程序#!/bin/bash red='\033[0;31m' green='\033[0;32m' blue='\033[0;34m' yellow='\033[0;33m' plain='\033[0m' cur_dir=$(pwd) # check root [[ $EUID -ne 0 ]] && echo -e "${red}Fatal error: ${plain} Please run this script with root privilege \n " && exit 1 # Check OS and set release variable if [[ -f /etc/os-release ]]; then source /etc/os-release release=$ID elif [[ -f /usr/lib/os-release ]]; then source /usr/lib/os-release release=$ID else echo "Failed to check the system OS, please contact the author!" >&2 exit 1 fi echo "The OS release is: $release" arch() { case "$(uname -m)" in x86_64 | x64 | amd64) echo 'amd64' ;; i*86 | x86) echo '386' ;; armv8* | armv8 | arm64 | aarch64) echo 'arm64' ;; armv7* | armv7 | arm) echo 'armv7' ;; armv6* | armv6) echo 'armv6' ;; armv5* | armv5) echo 'armv5' ;; s390x) echo 's390x' ;; *) echo -e "${green}Unsupported CPU architecture! ${plain}" && rm -f install.sh && exit 1 ;; esac } echo "arch: $(arch)" os_version="" os_version=$(grep "^VERSION_ID" /etc/os-release | cut -d '=' -f2 | tr -d '"' | tr -d '.') if [[ "${release}" == "arch" ]]; then echo "Your OS is Arch Linux" elif [[ "${release}" == "parch" ]]; then echo "Your OS is Parch Linux" elif [[ "${release}" == "manjaro" ]]; then echo "Your OS is Manjaro" elif [[ "${release}" == "armbian" ]]; then echo "Your OS is Armbian" elif [[ "${release}" == "alpine" ]]; then echo "Your OS is Alpine Linux" elif [[ "${release}" == "opensuse-tumbleweed" ]]; then echo "Your OS is OpenSUSE Tumbleweed" elif [[ "${release}" == "openEuler" ]]; then if [[ ${os_version} -lt 2203 ]]; then echo -e "${red} Please use OpenEuler 22.03 or higher ${plain}\n" && exit 1 fi elif [[ "${release}" == "centos" ]]; then if [[ ${os_version} -lt 8 ]]; then echo -e "${red} Please use CentOS 8 or higher ${plain}\n" && exit 1 fi elif [[ "${release}" == "ubuntu" ]]; then if [[ ${os_version} -lt 2004 ]]; then echo -e "${red} Please use Ubuntu 20 or higher version!${plain}\n" && exit 1 fi elif [[ "${release}" == "fedora" ]]; then if [[ ${os_version} -lt 36 ]]; then echo -e "${red} Please use Fedora 36 or higher version!${plain}\n" && exit 1 fi elif [[ "${release}" == "amzn" ]]; then if [[ ${os_version} != "2023" ]]; then echo -e "${red} Please use Amazon Linux 2023!${plain}\n" && exit 1 fi elif [[ "${release}" == "debian" ]]; then if [[ ${os_version} -lt 11 ]]; then echo -e "${red} Please use Debian 11 or higher ${plain}\n" && exit 1 fi elif [[ "${release}" == "almalinux" ]]; then if [[ ${os_version} -lt 80 ]]; then echo -e "${red} Please use AlmaLinux 8.0 or higher ${plain}\n" && exit 1 fi elif [[ "${release}" == "rocky" ]]; then if [[ ${os_version} -lt 8 ]]; then echo -e "${red} Please use Rocky Linux 8 or higher ${plain}\n" && exit 1 fi elif [[ "${release}" == "ol" ]]; then if [[ ${os_version} -lt 8 ]]; then echo -e "${red} Please use Oracle Linux 8 or higher ${plain}\n" && exit 1 fi elif [[ "${release}" == "virtuozzo" ]]; then if [[ ${os_version} -lt 8 ]]; then echo -e "${red} Please use Virtuozzo Linux 8 or higher ${plain}\n" && exit 1 fi else echo -e "${red}Your operating system is not supported by this script.${plain}\n" echo "Please ensure you are using one of the following supported operating systems:" echo "- Ubuntu 20.04+" echo "- Debian 11+" echo "- CentOS 8+" echo "- OpenEuler 22.03+" echo "- Fedora 36+" echo "- Arch Linux" echo "- Parch Linux" echo "- Manjaro" echo "- Armbian" echo "- AlmaLinux 8.0+" echo "- Rocky Linux 8+" echo "- Oracle Linux 8+" echo "- OpenSUSE Tumbleweed" echo "- Amazon Linux 2023" echo "- Virtuozzo Linux 8+" exit 1 fi install_base() { case "${release}" in ubuntu | debian | armbian) apt-get update && apt-get install -y -q wget curl tar tzdata ;; centos | almalinux | rocky | ol) yum -y update && yum install -y -q wget curl tar tzdata ;; fedora | amzn | virtuozzo) dnf -y update && dnf install -y -q wget curl tar tzdata ;; arch | manjaro | parch) pacman -Syu && pacman -Syu --noconfirm wget curl tar tzdata ;; opensuse-tumbleweed) zypper refresh && zypper -q install -y wget curl tar timezone ;; *) apt-get update && apt install -y -q wget curl tar tzdata ;; esac } gen_random_string() { local length="$1" local random_string=$(LC_ALL=C tr -dc 'a-zA-Z0-9' </dev/urandom | fold -w "$length" | head -n 1) echo "$random_string" } config_after_install() { local existing_username=$(/usr/local/x-ui/x-ui setting -show true | grep -Eo 'username: .+' | awk '{print $2}') local existing_password=$(/usr/local/x-ui/x-ui setting -show true | grep -Eo 'password: .+' | awk '{print $2}') local existing_webBasePath=$(/usr/local/x-ui/x-ui setting -show true | grep -Eo 'webBasePath: .+' | awk '{print $2}') local existing_port=$(/usr/local/x-ui/x-ui setting -show true | grep -Eo 'port: .+' | awk '{print $2}') local server_ip=$(curl -s https://api.ipify.org) if [[ ${#existing_webBasePath} -lt 4 ]]; then if [[ "$existing_username" == "admin" && "$existing_password" == "admin" ]]; then local config_webBasePath=$(gen_random_string 15) local config_username=$(gen_random_string 10) local config_password=$(gen_random_string 10) read -p "Would you like to customize the Panel Port settings? (If not, a random port will be applied) [y/n]: " config_confirm if [[ "${config_confirm}" == "y" || "${config_confirm}" == "Y" ]]; then read -p "Please set up the panel port: " config_port echo -e "${yellow}Your Panel Port is: ${config_port}${plain}" else local config_port=$(shuf -i 1024-62000 -n 1) echo -e "${yellow}Generated random port: ${config_port}${plain}" fi /usr/local/x-ui/x-ui setting -username "${config_username}" -password "${config_password}" -port "${config_port}" -webBasePath "${config_webBasePath}" echo -e "This is a fresh installation, generating random login info for security concerns:" echo -e "###############################################" echo -e "${green}Username: ${config_username}${plain}" echo -e "${green}Password: ${config_password}${plain}" echo -e "${green}Port: ${config_port}${plain}" echo -e "${green}WebBasePath: ${config_webBasePath}${plain}" echo -e "${green}Access URL: http://${server_ip}:${config_port}/${config_webBasePath}${plain}" echo -e "###############################################" echo -e "${yellow}If you forgot your login info, you can type 'x-ui settings' to check${plain}" else local config_webBasePath=$(gen_random_string 15) echo -e "${yellow}WebBasePath is missing or too short. Generating a new one...${plain}" /usr/local/x-ui/x-ui setting -webBasePath "${config_webBasePath}" echo -e "${green}New WebBasePath: ${config_webBasePath}${plain}" echo -e "${green}Access URL: http://${server_ip}:${existing_port}/${config_webBasePath}${plain}" fi else if [[ "$existing_username" == "admin" && "$existing_password" == "admin" ]]; then local config_username=$(gen_random_string 10) local config_password=$(gen_random_string 10) echo -e "${yellow}Default credentials detected. Security update required...${plain}" /usr/local/x-ui/x-ui setting -username "${config_username}" -password "${config_password}" echo -e "Generated new random login credentials:" echo -e "###############################################" echo -e "${green}Username: ${config_username}${plain}" echo -e "${green}Password: ${config_password}${plain}" echo -e "###############################################" echo -e "${yellow}If you forgot your login info, you can type 'x-ui settings' to check${plain}" else echo -e "${green}Username, Password, and WebBasePath are properly set. Exiting...${plain}" fi fi /usr/local/x-ui/x-ui migrate } install_x-ui() { cd /usr/local/ if [ $# == 0 ]; then tag_version=$(curl -Ls "https://api.github.com/repos/MHSanaei/3x-ui/releases/latest" | grep '"tag_name":' | sed -E 's/.*"([^"]+)".*/\1/') if [[ ! -n "$tag_version" ]]; then echo -e "${red}Failed to fetch x-ui version, it may be due to GitHub API restrictions, please try it later${plain}" exit 1 fi echo -e "Got x-ui latest version: ${tag_version}, beginning the installation..." wget -N -O /usr/local/x-ui-linux-$(arch).tar.gz https://github.com/MHSanaei/3x-ui/releases/download/${tag_version}/x-ui-linux-$(arch).tar.gz if [[ $? -ne 0 ]]; then echo -e "${red}Downloading x-ui failed, please be sure that your server can access GitHub ${plain}" exit 1 fi else tag_version=$1 tag_version_numeric=${tag_version#v} min_version="2.3.5" if [[ "$(printf '%s\n' "$min_version" "$tag_version_numeric" | sort -V | head -n1)" != "$min_version" ]]; then echo -e "${red}Please use a newer version (at least v2.3.5). Exiting installation.${plain}" exit 1 fi url="https://github.com/MHSanaei/3x-ui/releases/download/${tag_version}/x-ui-linux-$(arch).tar.gz" echo -e "Beginning to install x-ui $1" wget -N -O /usr/local/x-ui-linux-$(arch).tar.gz ${url} if [[ $? -ne 0 ]]; then echo -e "${red}Download x-ui $1 failed, please check if the version exists ${plain}" exit 1 fi fi if [[ -e /usr/local/x-ui/ ]]; then systemctl stop x-ui rm /usr/local/x-ui/ -rf fi tar zxvf x-ui-linux-$(arch).tar.gz rm x-ui-linux-$(arch).tar.gz -f cd x-ui chmod +x x-ui # Check the system's architecture and rename the file accordingly if [[ $(arch) == "armv5" || $(arch) == "armv6" || $(arch) == "armv7" ]]; then mv bin/xray-linux-$(arch) bin/xray-linux-arm chmod +x bin/xray-linux-arm fi chmod +x x-ui bin/xray-linux-$(arch) cp -f x-ui.service /etc/systemd/system/ wget -O /usr/bin/x-ui https://raw.githubusercontent.com/MHSanaei/3x-ui/main/x-ui.sh chmod +x /usr/local/x-ui/x-ui.sh chmod +x /usr/bin/x-ui config_after_install systemctl daemon-reload systemctl enable x-ui systemctl start x-ui echo -e "${green}x-ui ${tag_version}${plain} installation finished, it is running now..." echo -e "" echo -e "┌───────────────────────────────────────────────────────┐ │ ${blue}x-ui control menu usages (subcommands):${plain} │ │ │ │ ${blue}x-ui${plain} - Admin Management Script │ │ ${blue}x-ui start${plain} - Start │ │ ${blue}x-ui stop${plain} - Stop │ │ ${blue}x-ui restart${plain} - Restart │ │ ${blue}x-ui status${plain} - Current Status │ │ ${blue}x-ui settings${plain} - Current Settings │ │ ${blue}x-ui enable${plain} - Enable Autostart on OS Startup │ │ ${blue}x-ui disable${plain} - Disable Autostart on OS Startup │ │ ${blue}x-ui log${plain} - Check logs │ │ ${blue}x-ui banlog${plain} - Check Fail2ban ban logs │ │ ${blue}x-ui update${plain} - Update │ │ ${blue}x-ui legacy${plain} - legacy version │ │ ${blue}x-ui install${plain} - Install │ │ ${blue}x-ui uninstall${plain} - Uninstall │ └───────────────────────────────────────────────────────┘" } echo -e "${green}Running...${plain}" install_base install_x-ui $1
-
大盘鸡VPS也能安装飞牛OS教程——新手5步实现Debian11安装飞牛OS教程 一 前言最近香港大盘鸡VPS卷起来了,像之前的Cnfaster,以及最近的VPS.town,都推出了仅收第一次硬盘配置费+每年固定240费用,5G带宽不要太快,折算下来非常划算,只要不跑路,这价格作为私人存储或者PT都是非常好的。配置费用明细 时长:年 HK$240.00 国家:中国香港 HK$0.00 CPU:2核 HK$0.00 内存:2048MB HK$0.00 系统盘:4000GB HK$480.00 流量:5000G HK$0.00 带宽:5000Mbps HK$0.00 IPv6数量:1个 HK$0.00 操作系统:Debian-12.0_x64 HK$0.00 合计费用: HK$720.00CNFaster的注册地址。进入地址后选择 云服务器-HKL Storage Special ,之后就可以自行配置需要的CPU、内存和硬盘容量了,我选择的是4t,大家可以按需选择。二 安装飞牛OS教程系统是基于Debian11 DD的系统第一步,打开你的SSH工具,连接你的Cnfaster的HK大盘鸡!第二步,使用bin456789大佬的DD脚本项目地址:https://github.com/bin456789/reinstall 不放心的可以去看一下项目,脚本如下:curl -O https://raw.githubusercontent.com/bin456789/reinstall/main/reinstall.sh || wget -O reinstall.sh $_第三步,看到完成提示后,输入如下命令运行脚本bash reinstall.sh fnos输入你需要设置的密码,和fnos系统盘的大小最小默认是8G,由于我的系统盘是40G,所以我设置得大一点,设置为20G第四步,回车执行后等待脚本跑完跑完会有提示,提示你可以输入命令:reboot开启重装脚本跑完会有类似界面第五步,访问FNOS后台输入访问FNOS后台 例如你的IP是123.123.123.123 那后台地址就是 http://123.123.123.123:5666成功安装!后续就是设置你的密码啦,教程到此结束!
-
纯血鸿蒙系统如何安装电报、推特、Tiktok和油管APP 0 前言鸿蒙系统Harmonyos是华为开放的一款跨终端操作系统,其中手机操作系统最新版为Harmony next5.0,因其流畅高效而著称,目前唯一不足的是软件生态不够完整,特别是一些科学软件。前面本站介绍过如何在鸿蒙next下通过安装器安装第三方软件,以及如何安装Clash Meta实现科学上网,具体可以参考:1.让鸿蒙也能自由安装应用,小白鸿蒙开源自助餐图文教程2.鸿蒙Next也能科学上网?Clash Meta for harmorny next os上面两篇教程是本文的基础,建议第一次接触的网友先阅读,今天的教程是在实现科学后,如何纯血鸿蒙系统如何安装电报、推特、Tiktok和油管APP。1 下载对应的hap应用安装包目前电报、推特、Tiktok和油管APP是通过侧载应用的方式安装到鸿蒙系统的,实际上是网页封装形式,但不影响使用,相应的hap安装包我放到123云盘,可以自取:应用下载地址备用地址推特xhttps://www.123684.com/s/jiEmjv-It0xd提取码:9ucOhttps://www.123912.com/s/jiEmjv-It0xd提取码:9ucOYoutubehttps://www.123684.com/s/jiEmjv-Mt0xd提取码:cblOhttps://www.123912.com/s/jiEmjv-Mt0xd提取码:cblOTelegramhttps://www.123684.com/s/jiEmjv-wt0xd提取码:wEM5https://www.123912.com/s/jiEmjv-wt0xd提取码:wEM5Tiktokhttps://www.123684.com/s/jiEmjv-gt0xd提取码:PJNYhttps://www.123912.com/s/jiEmjv-gt0xd提取码:PJNY解压密码:www.vvars.com2 电脑打开鸿蒙安装器,将下载的hap拖入上传框(或者点击“单击上传”选择hap安装包),手机通过数据线连接到电脑(手机记得的打开调试模式)3 点击 开始创建,会提示登录华为账号,授权,然后下一步,最后提示安装成功4 手机上打开使用电报、推特、Tiktok和油管APP安装过程是一样的,接下来快乐冲浪吧。
-
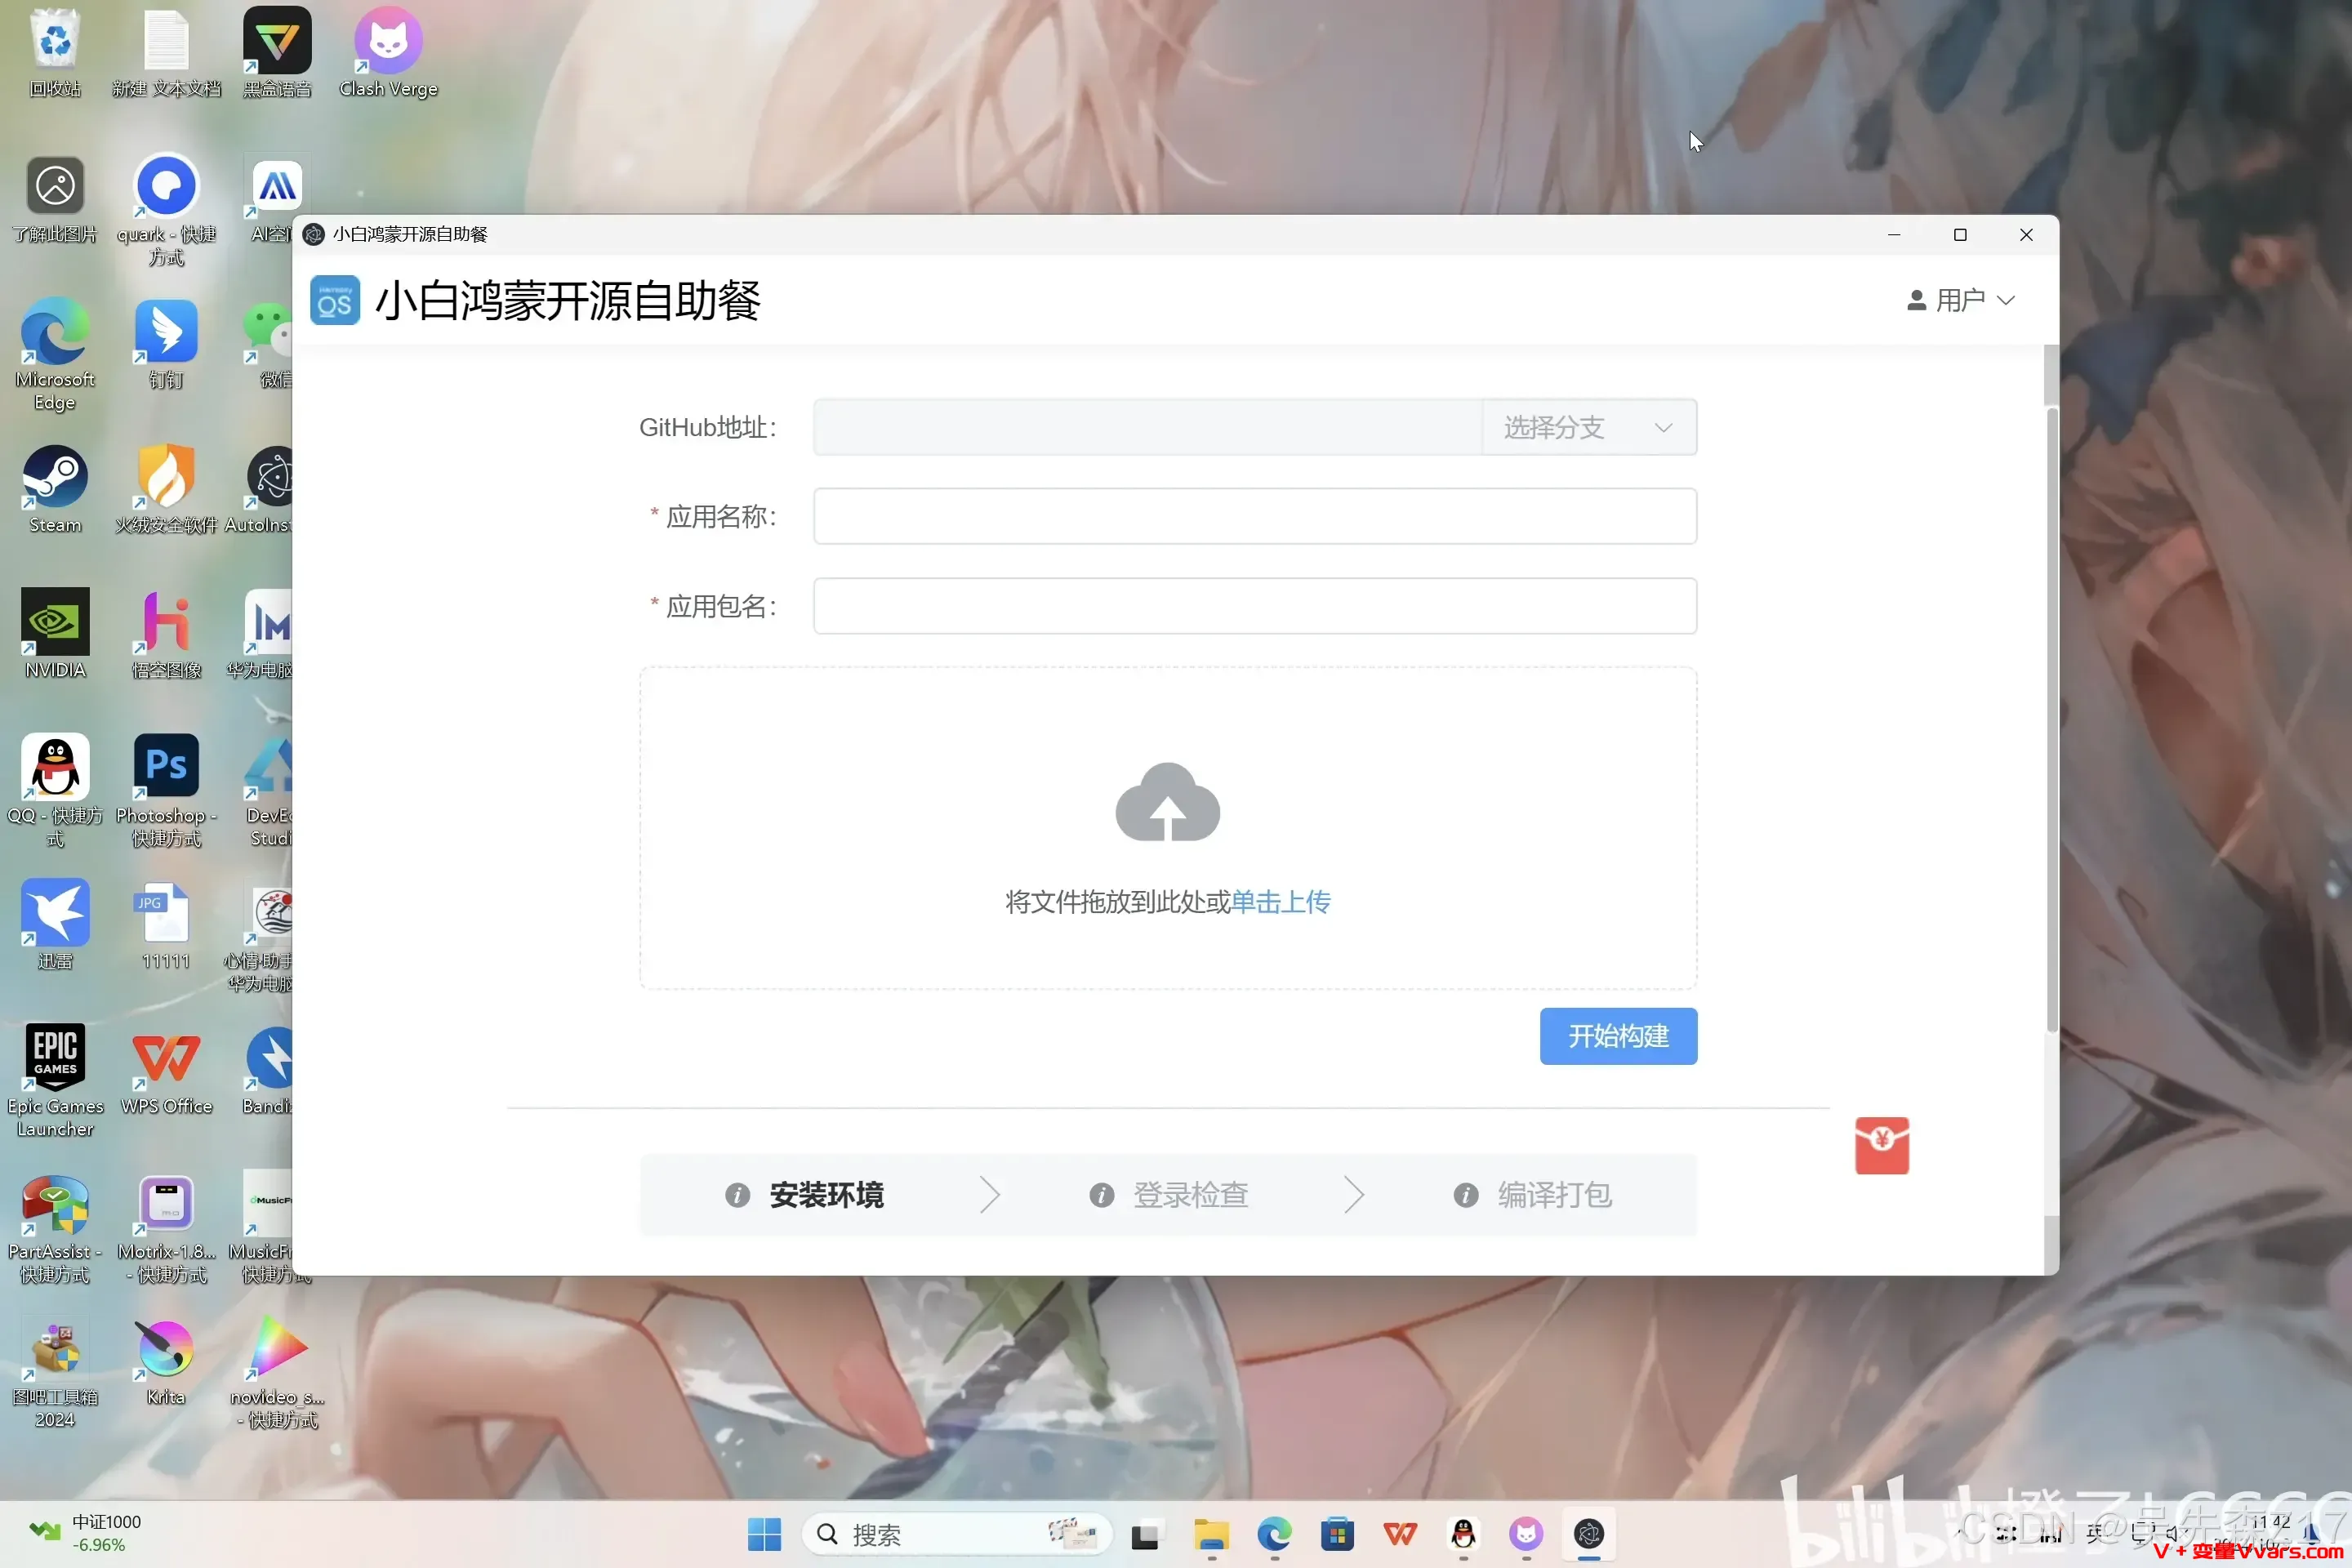
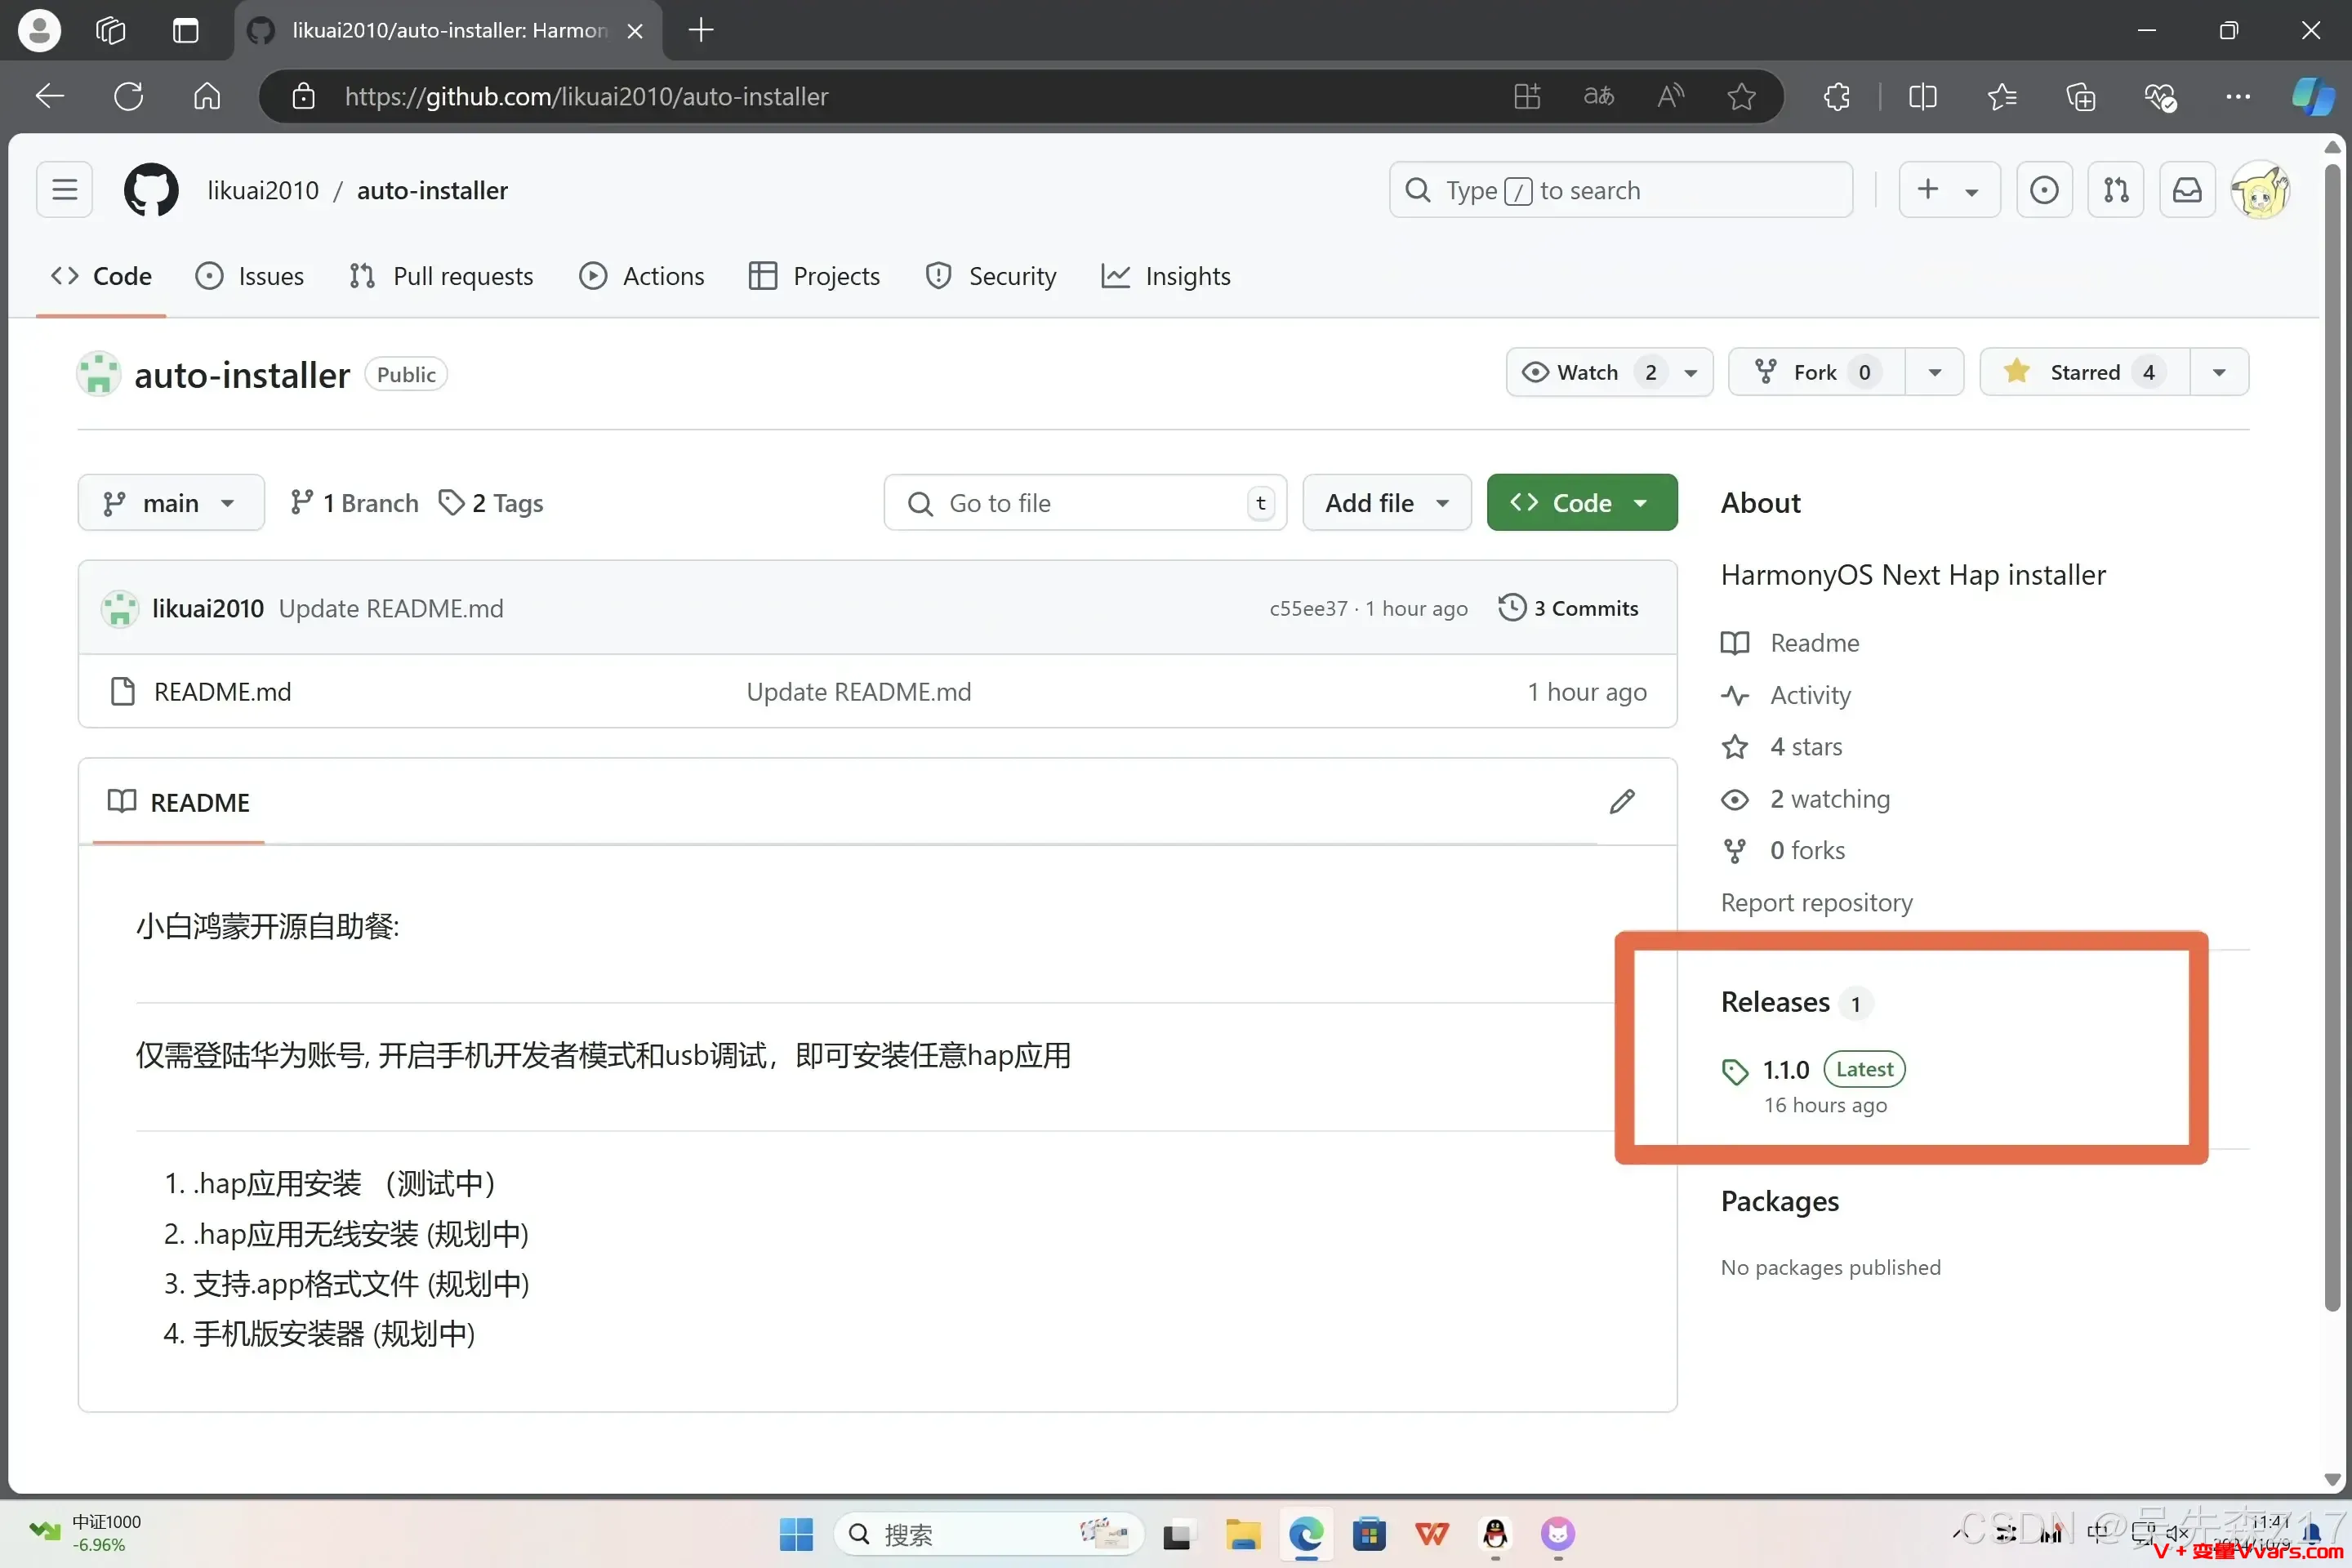
让鸿蒙也能自由安装应用,小白鸿蒙开源自助餐图文教程 0 前言鸿蒙系统Harmonyos是华为开放的一款跨终端操作系统,其中手机操作系统最新版为Harmony next5.0,因其流畅高效而著称,目前唯一不足的是软件生态不够完整,特别是一些科学软件。在完成本文的鸿蒙安装器后,可以通过安装科学软件和外网APP实现上网,关于如何安装Clash Meta实现科学上网及外网APP安装,具体可以参考:1.鸿蒙Next也能科学上网?Clash Meta for harmorny next os2.纯血鸿蒙系统如何安装电报、推特、Tiktok和油管APP1. 进入鸿蒙安装器下载网站(建议打开科/学),为小白鸿蒙开源自助餐项目,(可小星星关注此项目,下次能快速找到项目关注更新)找到网站中releases最新版本(如下图),点进去。2.下载最新版本中的.exe文件(win系统),目前最新版本为1.2.43.双击安装4.安装后,打开此软件5.可将hap安装包直接拖入,或者点击“单击上传”选择hap安装包6. next系统手机/平板设备,打开开发者模式(设置如下图位置,多次点击“软件版本”打开开发者模式,会重启)7.进入设置—系统—开发者选项,打开“usb调试”,线连手机和电脑8.点击“开始构建”,并点击“下一步”(无需安装docker)9.弹出登录华为账号窗口,输入自己的华为账号登录即可10.点击下一步,直到安装成功最后,为了不方便科学的网友,还是放个123云盘链接吧网盘地址提取码123云盘https://www.123684.com/s/jiEmjv-ot0xd https://www.123912.com/s/jiEmjv-ot0xdLm9U
-
节省本地硬盘空间,让OneDrive显示在线文件而不占用硬盘空间 Windows 10开始,微软为其配备了新的OneDrive,同时同步逻辑也大大改变。以往在Windows 8.1,可以设置那些文件脱机可用,那些文件只显示一个“快捷方式”一样的图标,真正在使用的时候再下载就可以。而安装了Windows 10之后,OneDrive一开始便要用户选择要同步的OneDrive文件夹,而且是之后同步到本地的文件才可以看到并使用,没有同步的文件根本看不到。说实话这是极大的退步,而且本来用来节约本地空间的同步功能,反而占用大量空间。现在有一个方法,可以让Windows 10上的OneDrive使用像Windows 8.1一样的同步逻辑,让用户浏览所有OneDrive文件的同时,不占用系统硬盘空间。步骤如下:1 转到网址https://onedrive.live.com/,使用自己的outlook账号登陆。国内将outlook网页封锁了,可能需要特殊姿势才能登陆。登录OneDrive2 随便打开一个文件夹。比如图中的Documents。注意地址栏中地址的变化。打开文件夹3 复制地址栏中,“?id=”之后,“%”之前的部分。复制地址栏4 打开“此电脑”(就是资源管理器),注意一定在“此电脑”的状态下,而不是资源管理器的默认状态下(能看到分区)。点击标题栏附近的“计算机”标签,然后点击“映射网络驱动器”。映射网络驱动器5 在弹出窗口中,可与选择映射的驱动器盘符,然后在“文件夹”中输入:https://d.docs.live.net/刚才复制的“?id=”后的部分,如https://d.docs.live.net/9797868713D3984E。下面两个选项也一并勾选。点击完成。设置映射网络驱动器5 系统会提示正在尝试连接到OneDrive,稍等片刻。正在尝试连接6 系统会弹出窗口,要求输入outlook账号和密码。输入邮箱地址和密码即可,同时勾选“记住我的凭据”。输入完毕,点击确定。输入登录凭据7 稍等片刻,会在“此电脑”中显示连接好的OneDrive,位于“网络位置”标签下。连接成功8 可以选择,右键,重命名为一个好记的名称,如“OneDrive”。双击添加的盘符,可以进入整个OneDrive文件夹,国内速度有些慢,但是可以使用。这时候,就获得了所有OneDrive的文件,而不用将文件同步到本地硬盘中,节约了大量空间。
-
纯血鸿蒙系统下如何安装安卓应用 0 前言纯血鸿蒙系统流畅,使用体验很好,唯一不足的是应用生态还不齐全,很多app都是毛坯房,相比安卓差的太远,这可能跟很多app开发还在观望有关。今天教大家如何在纯血鸿蒙系统安装apk安卓安装包,Soul是一款陌生人交友软件,就以纯血鸿蒙安装soul为例吧。我的鸿蒙版本是5.0.0.126SP8,soul去年9月发布后就没更新过,功能不能再简单了,写这篇文章时发现soul已被鸿蒙应用商店下架了。卓易通是鸿蒙5.0下一个补充暂时无法提供鸿蒙安装包的人软件安装,相当于一个虚拟机,不过这个虚拟机离的软件被筛选了一遍,需要通过特殊的方式来安装,比如soul正常在卓易通搜不到。废话不多说,直接上干货。1 打开卓易通,点击我的,选择文件互传2 文件互传页面选择下载的soul apk文件,将其加载到互传页面3 在文件互传页面点击soul apk安装包,选择安装4 选择允许卓易通安装应用5 点击 了解风险6 勾选,选择仍然安装7 安装完成,正常使用8 注意事项1)这个方法只能安装没有被屏蔽的apk,如chrome浏览器这种被完全屏蔽的直接不给安装;2)由于是虚拟机安装,有些功能如信息通知、图片上传可能会有异常。